Process 086 ☼ Using Composition To Tell Stories
GIVEAWAY: $150 gift certificate for Moment
Dear friends,
This week’s letter is about composition and includes some helpful techniques that I use to enhance my storytelling. Also, five ways to practice!
This week also marks the return of the PROCESS GIVEAWAY with a generous $150 gift certificate to spend in the Moment shop, on film, accessories, cameras, etc.
Housekeeping
I’m opening up a small number of mentoring slots for March. Read more about how it works here and book a session. Below is a testimonial from this month.
“My mentor session with Wesley was an amazing experience. His process was clear, concise and helped me define my current project with a clear path forward. I walked away from our session with renewed excitement about my project and I can’t wait to incorporate the advice and feedback given. Most importantly, Wesley made me feel comfortable and with the steps he provided I feel like I will have a stronger body of work. I can’t wait to work with him again.” — Peter Chatterton, photographer and Process reader.
Composition In Photography
As photographers we have a big toolkit to study and use to enhance our storytelling. There’s color, brightness, perspective, position, and today’s topic: composition.
A well-composed photograph is one where every element plays their part and adds to the story in a balanced and focused way. Nothing is superfluous or distracting, and everything helps the viewer make sense of the image. That is not to say there aren’t incredible images that break every single rule, but that’s for another time.
A good composition can come about through intention and with forethought. It can also happen accidentally, and it can even be created much later during the edit.
Below are five compositional techniques that I’ve found helpful throughout the years.
Figure-Ground Separation
Way back in Process 008 I talked about the concept of figure-ground separation, a principle from psychology that is a helpful tool in our composition toolkit.
Separation: An object isolated from everything else in a visual scene is more likely to be seen as a figure versus background. (source)
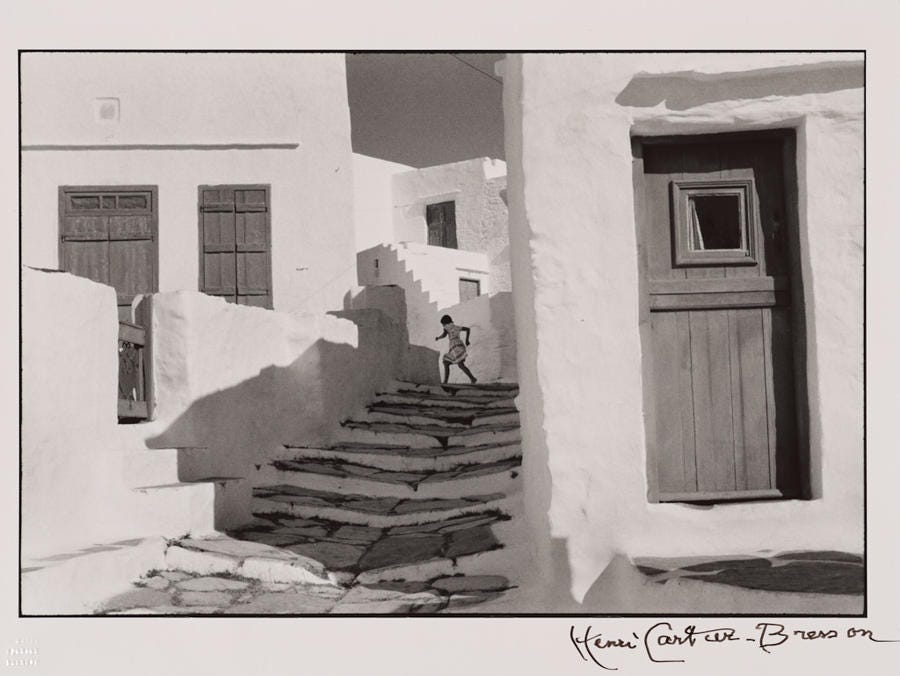
Here’s a perfect example by master photographer Henri-Cartier Bresson:
This photograph is a great illustration of the importance of separating our subject (figure) from their surroundings (ground). Our eyes immediately notice the child.
Her dark silhouette is framed by the light greys of her immediate surroundings, which in turn are surrounded by a ring of bright white structures. It tells a story right away, with great clarity. It’s easy our brain to process what is happening in a split second.
This image is such a masterclass that you can find three out of the four additional techniques I describe below apply here as well. Come back to it at the end and see.
Leading Lines
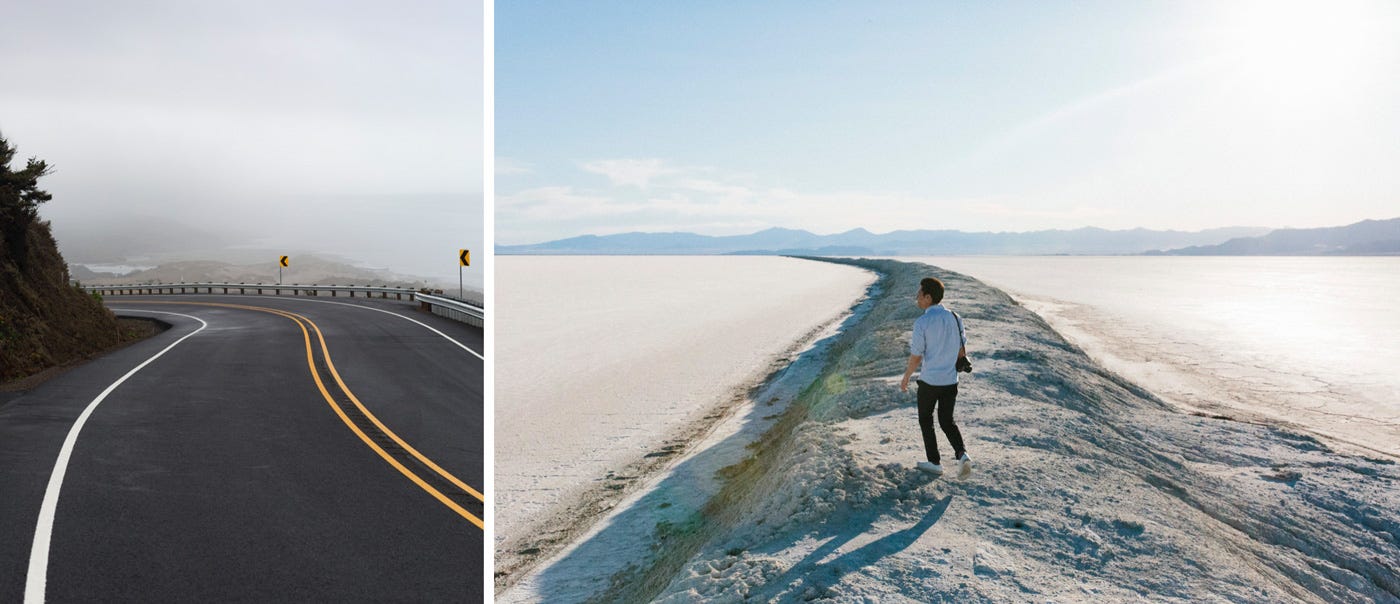
Leading lines are a tool to guide the viewer’s eyes through a photograph to the most important part of the story you’re telling. Below are two images from my travel photography portfolio which utilize this tool.
In the picture on the left a man-made and undulating line leads us down the path of travel and around the corner to the unknown. The road signs further enhance the direction I wanted the viewer’s eye to travel into and the fog below enhances the feeling of not knowing what is next.
In the picture on the right a line in the natural landscape lays out a path for Jason to walk down, elevated above the visual nothingness of the dried up ocean outside of Salt Lake City. I wanted to convey the story of a creative confidently walking his own path.
Negative Space
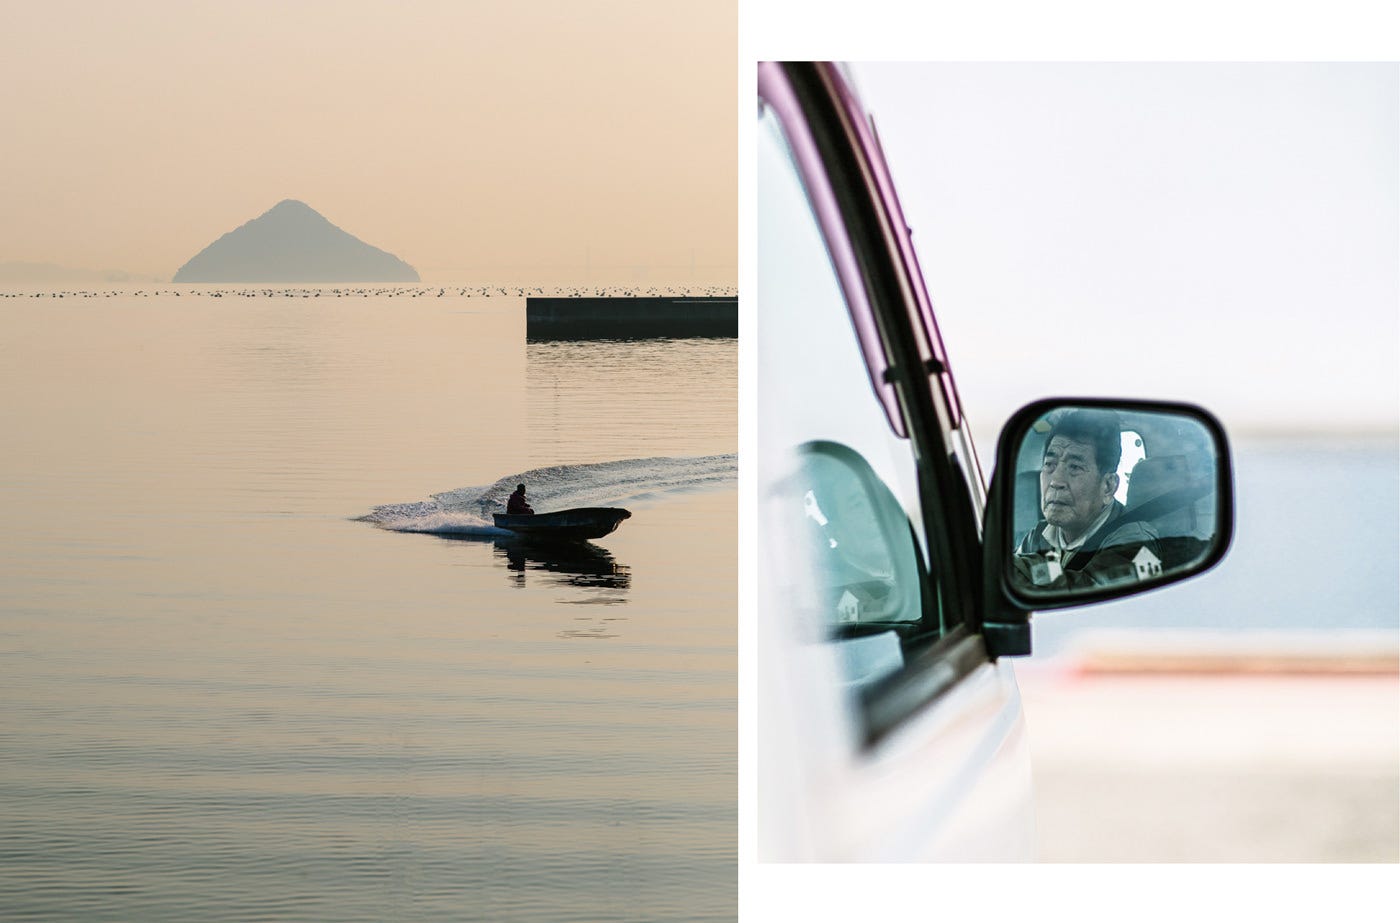
Isolating our subject in negative space is another way to bring clarity to our storytelling. It allows us to guide the viewer to what is important. It also creates a separation between our subject and the world around it to generate a feeling of solitude, loneliness, or calm. In the two images below, both taken on the beautiful Japanese island of Naoshima, I tell the story of solitary fishermen at sunrise.
The image on the left also includes a small leading line giving our subject a direction and movement, heavily implying he is just returning from sea. The image on the right is more on the sullen side and here I tried to tell a story of longing and waiting.
In both cases the fact that most of the image around the subject is practically empty means there is a world of meaning we can create for the viewer to pick up on.
Frame within a frame
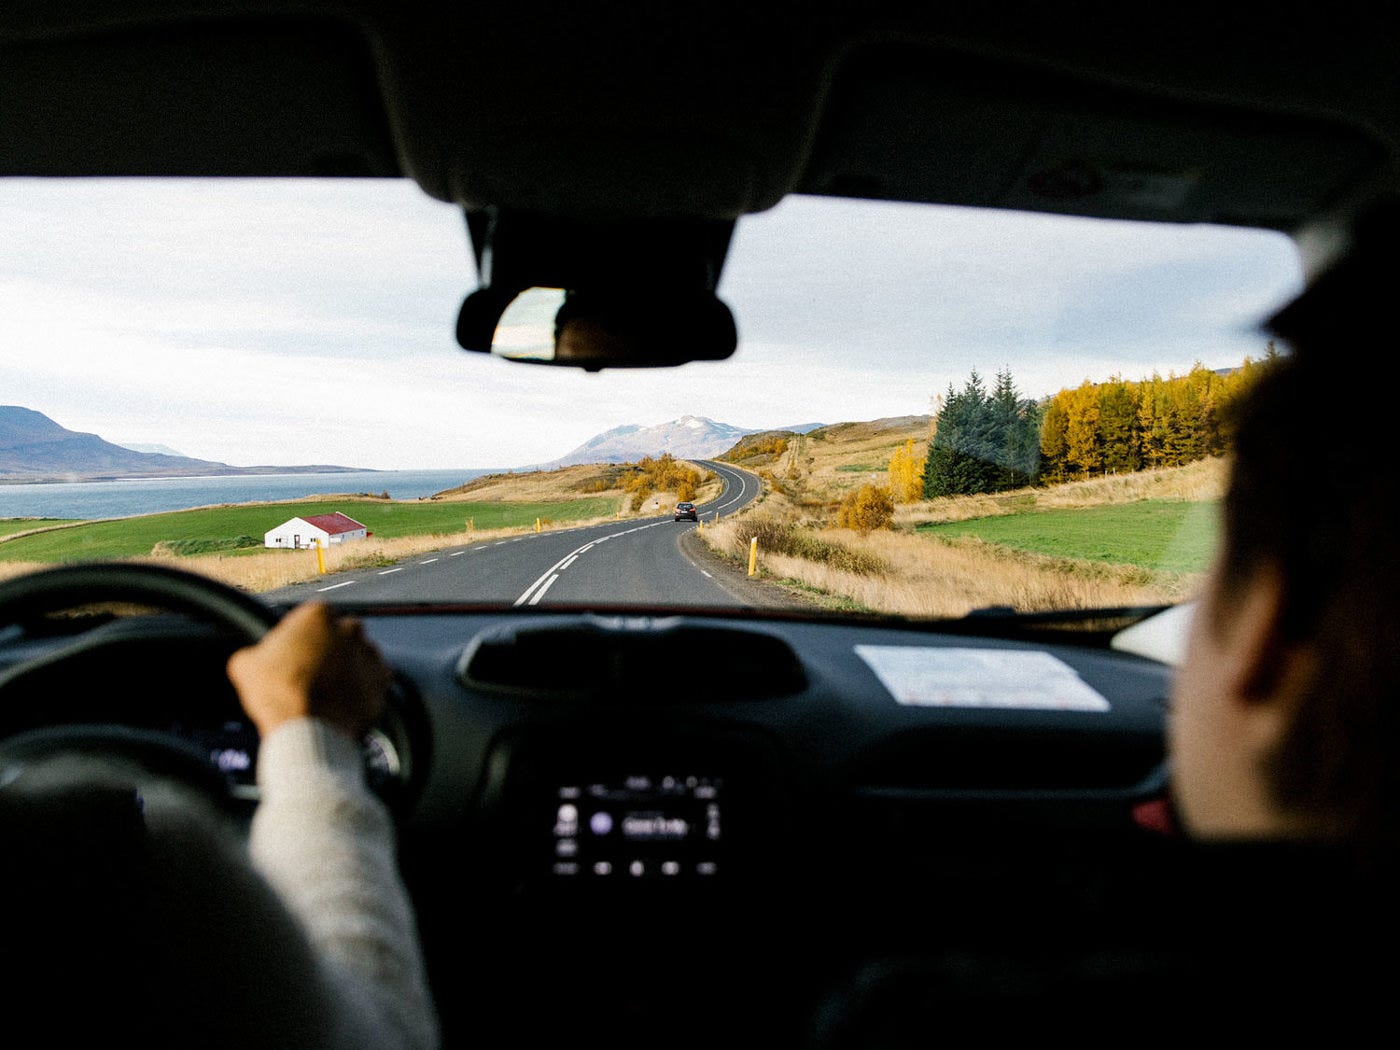
Every picture has a natural frame: the outside borders of the image. That’s the first frame. The second frame is created inside of the picture by using elements in the image to frame our ultimate subject once more.
Below is an image I shot while on a road trip in Iceland. By shooting through the windshield from inside the car I framed the magical landscape with the interior of the car and the outlines of my two co-passengers. I did this to create a story beyond just a lovely landscape. By placing the viewer in the backseat of the car I hoped they’d feel a sense of accessible adventure and travel imbued in the image.
Note that the image on the right above in the previous section also employs a frame within a frame. Windows, doors, and mirrors are natural elements for this technique.
Composing By Cropping
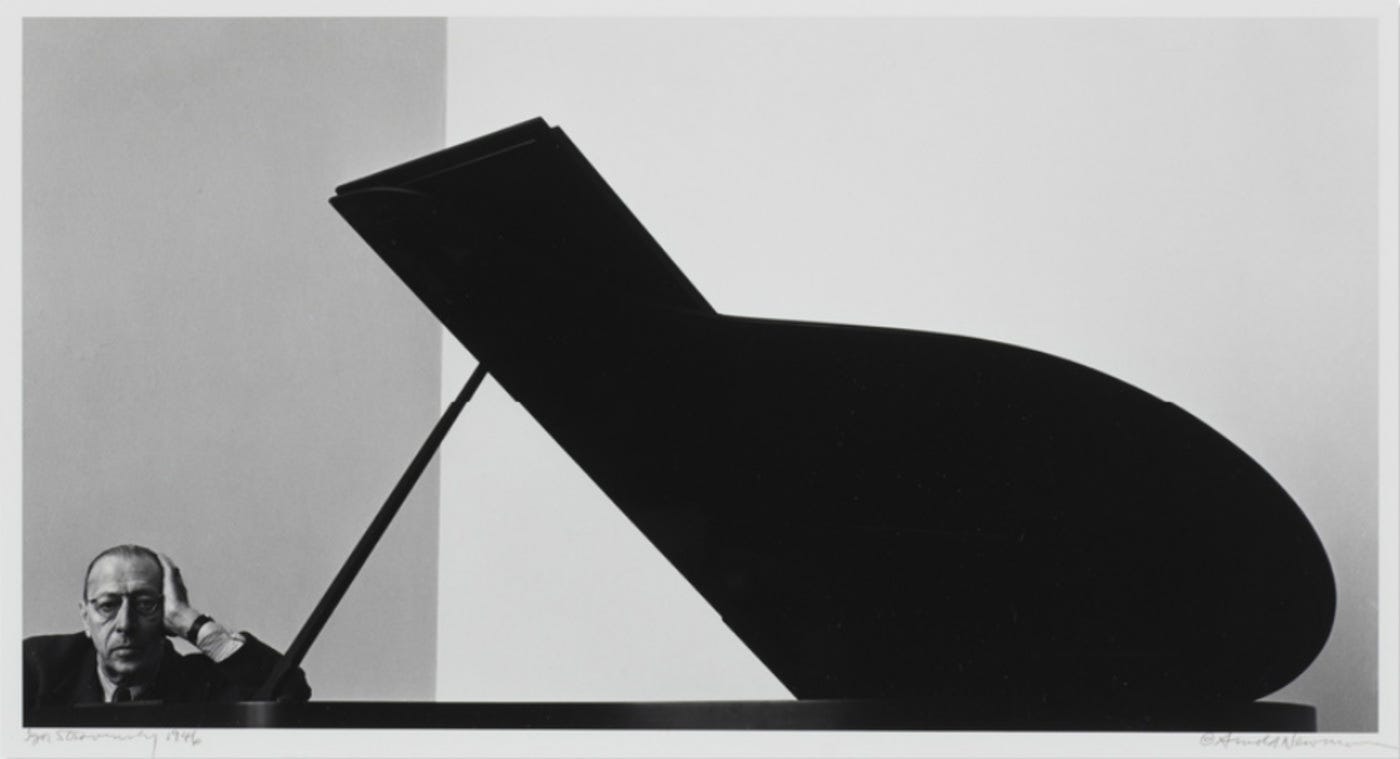
Photography legend Arnold Newman provides us with my favorite example of a powerful composition created by cropping the original image. This is his portrait of famed composer Igor Stravinsky, taken in 1946 for Harper’s Bazaar.
What a stunning image! The piano becomes an almost abstract musical annotation that dwarfs our subject. It’s so striking and in large part because of the composition.
In Mr. Newman’s own words:
“I had this idea: the top of an open piano looks like a half note. Its shape is strong. It’s linear. It’s quite beautiful. It looks the way Stravinsky’s music sounds.
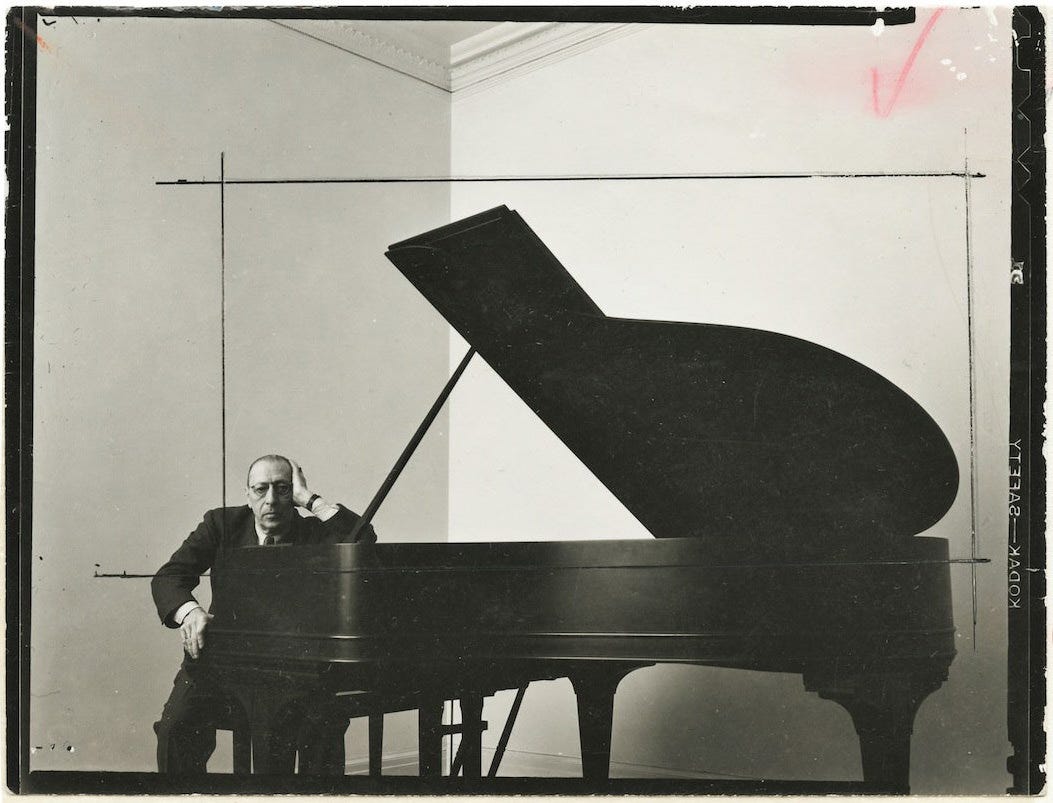
“I was 98% sure I knew how the final picture would look. I knew I’d cut off most of the top and bottom of the negative in the print, but I wasn’t certain about including Stravinsky’s right hand. That’s why I had him put it where it is. In the end, I cut it out too.”
Mr. Newman had anticipated the final composition when he took the original image, seen below with his daring crop lines drawn onto the print. Hilariously the client, Harper’s Bazaar, rejected the image. It went onto be Mr. Newman’s most famous work.
There are many other compositional techniques to explore like filling the frame, using contrast and color contrast, using patterns or similarities, using a low versus a high horizon, using a shallow depth of field, distinguishing between fore and background, etc. but this is a nice set to start off with and put into practice.
Five Ways To Practice Composition
One Lens, One Month — For the next month only use one lens, and make it a fixed one like a 35mm or a 50mm. This will challenge you to move closer and further away and compose in-camera rather than relying on cropping in post or zooming during the shoot.
Crop Your Archive — Dive into your archives and re-crop some past images creating a new composition. You’ll find you can drastically improve them still.
Crop Your Friends — Exchange images with a photographer friend and crop their images to create a new composition. This can be a someone from the Process community so hit the comments if you want to exchange pictures!
Get high and low — By getting low to the ground or high above your subject you can shift your perspective and create a new way to look at your subject with different and less common compositions.
Learn From Painting — Dig into the old masters of painting, including religious paintings by the likes of Caravaggio, and find spectacular compositions you can copy in your photography.
In the end, remember that everything you do compositionally should serve the image and the story you’re trying to tell. Most of the time that means bringing clarity and calm to an image and the techniques above are all great ways to do so.
That’s it for this week! Make sure to go back up to the Henry Cartier-Bresson image and most of the other techniques described applied masterfully. It’s a Process Puzzle.
Next week: I test out the Fujifilm GFX 100S during two different shoots and will share the resulting images and how it complemented my set up. I took some of my favorite recent portraits and documentary work with it.
Keep shooting and take good care of yourselves and others.
Wesley
PS You already know this but all my film work is developed and scanned by my friends at Carmencita Film Lab. Use code “PROCESS” at check out to get a free size upgrade.
Process Giveaway!
This week’s giveaway is in collaboration with my friends at Moment. One winner will receive a $150 giftcard so you can buy whatever you wish whether it is film, bags, an online course, or anything else from the Moment store.
To enter this week’s Process Giveaway answer the question below in the comment section for this issue:
QUESTION: Process readers live in over 140 countries across the world. Tell us: Where are you currently reading Process? And where would you move to if anything was possible?
My answer: I wrote this issue in Amsterdam and I would love to move to Tokyo for a year.
I’m excited to read everyone’s answers!
ENTER THIS WEEK’S GIVEAWAY before 11am EST on March 4th.
The winner will be randomly drawn. This giveaway is for Process subscribers only.
Major shout out to my friends at Moment for sponsoring this giveaway. Check out their webshop for all your photo needs.
Did you enjoy this issue? Share it with a friend who might love it too.
Can’t get enough? Browse the Process Archives.
Find me on Glass / LinkedIn / Instagram / Twitter / Pocket / YouTube



Reading in Santa Cruz, California. If anything was possible I would move to Narnia. The idea of talking animals sounds interesting. It would offer a different perspective on life at least.
Reading in Rotterdam, NL - since Wesley already picked Tokyo and want to be original… I’d buy a large format camera, an Andel Adams-style Stetson hat and move to Patagonia, Argentina.